Managing Provider Checklists
The documents within the checklists are stored in the Provider Library (for more information, see Setting up Provider Checklists).
Once a privileging period is initiated and a checklist is assigned, it can be managed for completion.
Access the Actions Menu:
- Click Providers on the left side of any RFX screen.
- In any tab (Active, Pending, Inactive), click the View button
 next to the provider's name.
 - Click the Privileging tab on the provider’s page.
- Click the Actions button within the relevant privileging period to access the checklist.
- Click Manage Checklist.

Once opened, a full-screen, side-by-side editor will allow for easy data entry. The % completed will be displayed at the top, along with the provider's name and privileging dates (if applicable).
At any time, a document can be added via the Actions button on the top right (it can be uploaded or requested after being added).
Helpful Hint: Documents uploaded to this screen will not appear in the provider's tabs until after privileging is approved. This area serves as a holding spot until approval is granted.
![]()
Document List and Functions
The checklist displays the name, status, and available actions for each document. The following functions are available:
- Request from Provider – Request individual documents from the provider directly within the checklist
- Peer Reference Requests: A request is sent to the peer. Note: Authorization and Release Form must be completed by the provider before sending the reference request to the peer. (See Managing Peer Reference Requests).
- Drag and Drop Reorder – Change the order of documents to dictate the order of pages in the final generated PDF.
- Delete – Remove the document from the checklist. This will prevent it from appearing in the provider's file.
Document Statuses
Checklist documents can be in one of the following states:
- Incomplete – No document uploaded.
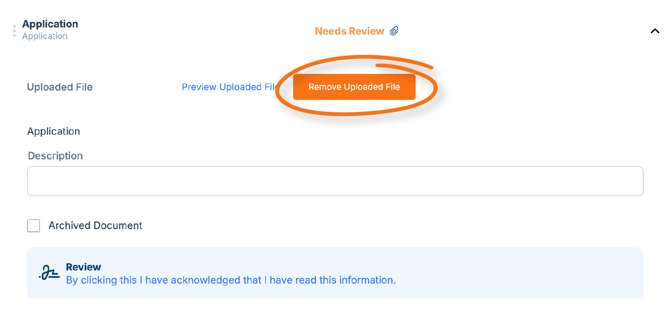
- Needs Review – Document uploaded by the facility or provider (indicated by a paperclip icon).
- Requested from Provider – Document pending upload.
- Complete – Document has been reviewed.

Actions after expanding a document:
- Preview Uploaded File – Verify if the document meets facility standards.
- Perform Verification (e.g., OIG, DEA License) – (See Performing Verifications).
- Send Reminder or Cancel Request – If the document was requested from the provider.
- The provider can upload documents via the mobile app or website. See Requesting Documents.
-
- The uploaded document will appear as if it was uploaded directly.
- Upload Document – Option to upload if not requested or provided by the provider.
- Enter Dates, License Numbers, State, etc. – (Criteria set in the Provider Library, see Setting Up the Provider Library).
- Write a Description of the document (optional).
- Archive Document (optional).
- Checklist Review Acknowledgement (Required):
- Checklist items must be reviewed and acknowledged before being marked as complete. This ensures no documents are completed before review for accuracy.
-
- For new checklists still pending finalization, documents must be reviewed and acknowledged or remain Incomplete.
-
- To acknowledge, select each document in the checklist, then click the Acknowledgement area at the bottom. The document will then show as Complete.

- Remove Uploaded File:
- Choose not to resend the document request.
-
- Upload the document manually to the checklist.
-
- Resend the document request to the provider or staff.
-
- Optionally, add comments when resending that are visible to the provider or staff.

Finalizing the Checklist
The checklist doesn't need to be complete to move on to Committee Review. However, once in Committee Review, no new documents can be added. If a document needs to be added, the process must start over.
Once the checklist is considered complete, the Committee Review can proceed. (See Committee Review Overview).
